ownCloud is a flexible, self-hosted open source PHP web application. It can be used for data synchronization and file sharing. ownCloud is one of the best alternative for Google Drive, Box, Dropbox, iCloud and other cloud platforms. It have a lot of benefits, to self host your storege cloud like better privacy and storage limited by your own.
Installing ownCloud on Debian is not magic and can be simple done by someone, who just have root access to the server. Let’s get started with installing ownCloud on your Debian 9 server.
If you need help, you can simply ask me via the contact form. I would be happy to install the ownCloud on your server for only € 50.
To can setup the server easily, you can install some good tools like Midnight Commander.
sudo apt install mc1. Install MySQL Server
ownCloud can use MySQL/MariaDB, PostgreSQL or SQLite as a backend data storage. It have besser performance, if you use MariaDB. If you have a small vserver with limited ram so better go to step 3 and use just PostgreSQL. To install the MariaDB server run the following command:
sudo apt install mariadb-server mariadb-clientWhen the installation is finish, run the following commands to start and enable the MariaDB service:
sudo systemctl start mariadb
sudo systemctl enable mariadb
To set a password just run the install helper from MariaDB:
sudo mysql_secure_installation2. Create MySQL Database and User
To create the database and add a mysql user with full access for our ownCloud installation run the following commands:
mysql -u root -p
MariaDB [(none)]> CREATE DATABASE owncloud CHARACTER SET utf8;
MariaDB [(none)]> GRANT ALL PRIVILEGES ON owncloud.* TO 'owncloud'@'localhost' IDENTIFIED BY 'owncloud_passwd';
MariaDB [(none)]> FLUSH PRIVILEGES;
MariaDB [(none)]> \q
Install Redis
Redis is an in-memory database which will be used by the ownCLoud installation as memory cache. It speed up everything a little bit. To install the latest Redis version run the following command:
sudo apt install redis-server redis-tools3. Install Apache and PHP
ownCloud need an installed Apache, PHP and PHP 7.3 modules. Accuatlly it is not compatible with php7.4. To install everything just run the following command:
sudo apt install apache2 libapache2-mod-php7.3 openssl php-imagick php7.3-common php7.3-curl php7.3-gd php7.3-imap php7.3-intl php7.3-json php7.3-ldap php7.3-mbstring php7.3-mysql php7.3-pgsql php-smbclient php-ssh2 php7.3-sqlite3 php7.3-xml php7.3-zip php-redis php-apcuWhen the installation is complete, run the following commands to start and enable the Apache service:
sudo systemctl start apache2
sudo systemctl enable apache2
4. Install ownCloud
The ownCloud 10 package is not available in the default Debian 10 Buster repositories, so we have to add the official ownCloud repository to the apt sources. First add the ownCloud GPG key to the apt sources keyring:
wget -qO- https://download.owncloud.org/download/repositories/stable/Debian_10/Release.key | sudo apt-key add -Once the key is added run the following command to enable the ownCloud repository:
echo 'deb https://download.owncloud.org/download/repositories/stable/Debian_10/ /' | sudo tee /etc/apt/sources.list.d/owncloud.listBefore you can install the ownCloud package we need to enable HTTPS transport for the debian apt tool by installing the following package:
sudo apt install apt-transport-httpsNext just update the apt cache list and install the ownCloud package with the following commands:
sudo apt update
sudo apt install owncloud-files
The command above will install ownCloud in the /var/www/owncloud directory. Everything you uploaded or need to change is in that directory.
5. Configure Apache
Next just configure the Apache web server to serve the ownCloud directory create a new configuration file with the following content:
sudo mcedit /etc/apache2/sites-available/owncloud.confAlias /owncloud "/var/www/owncloud/"
<Directory /var/www/owncloud/>
Options +FollowSymlinks
AllowOverride All
<IfModule mod_dav.c>
Dav off
</IfModule>
SetEnv HOME /var/www/owncloud
SetEnv HTTP_HOME /var/www/owncloud
</Directory>It just redirect all host with the folder /owncloud added to ownCloud. If you like to set an extra host, edit YOUR_HOST_NAME with your hostname and use the following code:
<VirtualHost *:80>
	ServerName YOUR_HOST_NAME
	ServerAdmin webmaster@localhost
	DocumentRoot /var/www/owncloud
	<Directory />
		Options FollowSymLinks
		AllowOverride None
	</Directory>
	<Directory /var/www/owncloud/>
		Options Indexes FollowSymLinks MultiViews
		AllowOverride All
		Order allow,deny
		allow from all
	</Directory>
	ScriptAlias /cgi-bin/ /usr/lib/cgi-bin/
	<Directory "/usr/lib/cgi-bin">
		AllowOverride None
		Options +ExecCGI -MultiViews +SymLinksIfOwnerMatch
		Order allow,deny
		Allow from all
	</Directory>
	ErrorLog ${APACHE_LOG_DIR}/error.log
	# Possible values include: debug, info, notice, warn, error, crit,
	# alert, emerg.
	LogLevel warn
	CustomLog ${APACHE_LOG_DIR}/access.log combined
</VirtualHost>
Enable the Apache ownCloud configuration and restart the Apache web server:
sudo a2ensite owncloud
sudo systemctl restart apache2
Finally set the correct permissions, so the ownCloud can upload files:
sudo chown -R www-data: /var/www/owncloud/6. Finish the ownCloud installation
In the last step of this guide we need to access to ownCloud Web Interface and finish the installation.
To finish the installation open your browser and navigate to http://your_server_ip_address/owncloud/ or use the hostname, if you have setup one.
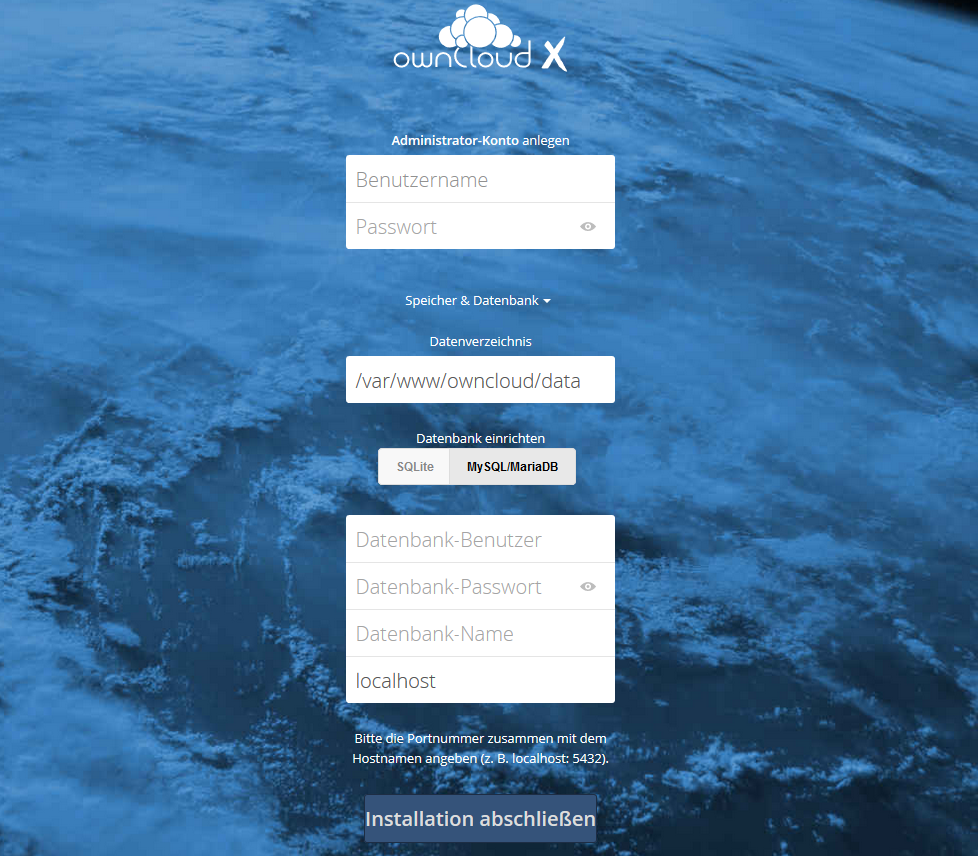
To create your first admin user enter the Username and Password under the “Create an admin account” label. Next click on “Storage & Database” link, which will give you an option to select your database backend.
Leave the default “Data Folder” value “/var/www/owncloud/data”. Just edit the Database under the “Configure the database” label and select “MySQL/MariaDB”. In the database fields enter the database user, the database user password and the database name you previously created.
To finish the installation click on “Finish setup” button and the ownCloud installer will populate the database and redirect you to the ownCloud login screen.
Now you are finish! Quite easy or? If you need any help wite an comment or go to the official ownCloud User Manual.
Hello, I had a problem with mycrypt, it was not on the system, I found a way for easy installation. I will get a great tutorial. Sorry for the english (translator)
https://varunver.wordpress.com/2019/10/11/install-php-mcrypt-on-debian-10-php-7-3/
sudo apt install php7.3-mcrypt
E: Unable to locate package php7.3-mcrypt
E: Couldn’t find any package by glob ‘php7.3-mcrypt’
E: Couldn’t find any package by regex ‘php7.3-mcrypt’
————————-
sudo apt install owncloud-files
E: Unable to locate package owncloud-files
We have removed php7.3-mcrypt. If you don’t find owncloud-files, you havend added owncloud repository: echo ‘deb https://download.owncloud.org/download/repositories/stable/Debian_10/ /’ | sudo tee /etc/apt/sources.list.d/owncloud.list